^ Click Here
Showing posts with label Spring. Show all posts

Friday, September 14, 2012

Sending HTML (as) Mail through Java (Spring)

[This is basically an extension of the earlier post Sending Simple Mail through Java (Spring) ]

In this mail we will try to send HTML(and CSS) as mails.....please refer to the earlier post about simple mail as there is no point in repeating things, Moreover this would contain an example which would build on earlier post example. Just to make sure we don't miss anything.

So basically no changes in the Spring application context Spring.xml file.

<bean class="org.springframework.mail.javamail.JavaMailSenderImpl" id="mailSender">
    <property name="host" value="smtp.gmail.com">
    <property name="port" value="587">
    <property name="username" value="username">
    <property name="password" value="password">
    <property name="javaMailProperties">
       <props>
           <prop key="mail.smtp.auth">true</prop>
           <prop key="mail.smtp.starttls.enable">true</prop>
       </props>
    </property>
</bean>
But to send HTML in mail SimpleMailMessage won't work. That is actually too simple for the task. Hence for this we would need a MimeMessage. MimeMessage is very much different from SimpleMailMessage however one of the biggest and more likable advantage we have with MimeMessage is MimeMessageHelper.


package mimeSendMail;

import javax.mail.internet.MimeMessage;
import org.springframework.mail.javamail.JavaMailSender;
import org.springframework.mail.javamail.MimeMessageHelper;
import org.springframework.beans.factory.annotation.Autowired;
import org.springframework.stereotype.Component;

@Component
public class MimeSendMail
{

 @Autowired
 private JavaMailSender mailSender; 

public void sendMimeMessage(String from, String[] to, String subject, String msg) throws Exception{
  MimeMessage mime = this.mailSender.createMimeMessage();
  MimeMessageHelper helper = new MimeMessageHelper(mime, true);
  helper.setFrom(from);
  helper.setTo(to);
  helper.setSubject(subject);
  String htmlText = "<div style='background:#00FA9A;text-align:center;"+
                "font-size:12pt;font-weight:bold;color:#800000;padding:10px;'>"+
                "That feeling when......<br /><br />"+
                "You miss your spectacles while looking for your spectacles....<br /><br />"+
                "The person whom you secretly dislike, helps you......<br /><br />"+
                "The person whom you have crush on seems happy all the time....<br /><br />"+
                "the beggar recognizes you and stops asking for penny from you since you have never given....<br /><br />"+ 
                "</div>";
    helper.setText(htmlText,true);
    this.mailSender.send(mime);
    }
}

I guess this should do it. Yes, the HTML and inline css really looks nasty but I didn't find any way to transfer the css file to the mailing server and I doubt if there are any. Hence we have to live with inline css also a blessing in disguise about inline css is that it overrides other pre-defined css properties.

Here we saw that  from the JavaMailSender we create a MimeMessage and with that in turn we create MimeMessageHelper which does various task( much beyond rendering HTML text).

Now we are ready to give it a test.

package mimeSendMail;

import org.junit.Test;
import org.springframework.context.ApplicationContext;
import org.springframework.context.support.ClassPathXmlApplicationContext;
import mimeSendMail.MimeSendMail;

public class SendMailTest {

  @Test 
 public void mailTest(){
        ApplicationContext context = new ClassPathXmlApplicationContext("mimeSendMail/SpringMail.xml");

        MimeSendMail mm = (MimeSendMail) context.getBean("mimeSendMail");
        mm.sendMail("sender@gmail.com",
        new String[]{"recepient1@gmail.com","recepient2@rediffmail.com"},
        "Hello Friend", 
        "This is a test mail");
 } 
}

(Yeah I know the parameter msg is not being used and its redundant, you can get rid of that.)
Hope this helps.

Sunday, August 26, 2012

Sending Simple Mail through Java (Spring)

Seriously, there are plenty of examples for this available on net and mine isn't any different in that respect (well not this one). So here we go...

I am using a maven project but you can do it without that also though it would be bit pain to download the jar by yourself and putting them in buildpath.....still the concept that matters.

so first of all the dependency needed to be added is (I assume there is already a spring core, context and junit test dependency available).

<!-- Java Mail API -->
    <dependency>
     <groupId>javax.mail</groupId>
     <artifactId>mail</artifactId>
     <version>1.4.5</version>
    </dependency>

Secondly, since I am using maven and spring, I would define a bean in the Spring configuration xml file.

<bean class="org.springframework.mail.javamail.JavaMailSenderImpl" id="mailSender">
    <property name="host" value="smtp.gmail.com">
    <property name="port" value="587">
    <property name="username" value="username">
    <property name="password" value="password">
    <property name="javaMailProperties">
       <props>
           <prop key="mail.smtp.auth">true</prop>
           <prop key="mail.smtp.starttls.enable">true</prop>
       </props>
    </property>
</bean>

Now our java mail sender bean is ready (I don't need to tell that put your username and password value in the properties) we have define a gmail host smtp.gmail.com and port is 587 because that's the port gmail uses for smtp (though 25 is a default port for smtp). also we need to turn on few properties like auth and tls. but that's about configuration.

Now we will prepare for using this mailSender bean to send a simple message.

So here is my class for that -

package simpleSendMail;
 

import org.springframework.beans.factory.annotation.Autowired;
import org.springframework.mail.MailSender;
import org.springframework.mail.SimpleMailMessage;
import org.springframework.stereotype.Component;
 
@Component
public class SendMail
{
    @Autowired
    private MailSender mailSender;
 
 public void sendMail(String from, String[] to, String subject, String msg) {
  SimpleMailMessage message = new SimpleMailMessage();
  message.setFrom(from);
  message.setTo(to);
  message.setSubject(subject);
  message.setText(msg);
  mailSender.send(message); 
 }
}

As you see I have autowired the mailSender bean to be used here, instead of it you very well can define this class as a bean and in xml configuration file link mailSender bean to the property of this one....if that is the case don't forget to put a setter......maybe this will help.

So as you can see there is a method which takes parameter for from, to addresses and subject and text to be sent then initiates the object of SimpleMessage class , sets the value and with our mailSender it sends that SimpleMessage

below is the Test class for that.

package simpleSendMail;

import org.junit.Test;
import org.springframework.context.ApplicationContext;
import org.springframework.context.support.ClassPathXmlApplicationContext;

public class SendMailTest {

  @Test 
 public void mailTest(){
    ApplicationContext context = new ClassPathXmlApplicationContext("simpleSendMail/SpringMail.xml");

       SendMail mm = (SendMail) context.getBean("sendMail");
           mm.sendMail("sender@gmail.com",
        new String[]{"recepient1@gmail.com","recepient2@rediffmail.com"},
        "Hello Friend", 
        "This is a test mail");
 } 
}

Again in test method you will provide valid mail addresses for to and from option

This might( and most surely) would fail if you are behind some proxy or firewall which doesn't let you use the specified port directly and blocks it considering it a threat. (Solution? I am still trying to find out.)

Saturday, March 17, 2012

Autowiring with annotation and autodiscovering Example

We have seen the examples where Autowiring (with .xml) was done. It's sort of magical comprehensibility of Spring Framework where it by itself chooses the proper candidate and connect it to the respective beans

In last example it was autowiring with configuration in xml file, Now we will see it with annotation and autodiscovering. Autodiscovering is meant to be the setting where beans are auto discovered by Spring Framework through Classes and the annotations are used for setting the value and autowiring.

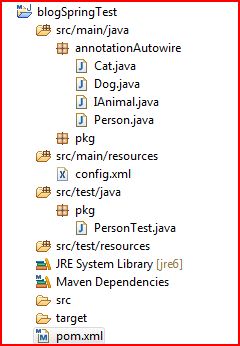
I made a package named "annotationAutowire" and inside that I put the same Classes which were there in the previous example of Spring Basic. The only difference that this time the classes are annotated.

the Class Person.java

package annotationAutowire;

import org.springframework.beans.factory.annotation.Autowired;
import org.springframework.beans.factory.annotation.Qualifier;
import org.springframework.beans.factory.annotation.Value;
import org.springframework.stereotype.Component;

@Component
public class Person {
 @Value("Rahul")
 private String name;
 private IAnimal animal;
 
 public void setName(String name) {
  this.name = name;
 }
 public String getName() {
  return name;
 }
 public IAnimal getAnimal() {
  return animal;
 }
 @Autowired
 @Qualifier("dog")
 public void setAnimal(IAnimal animal) {
  this.animal = animal;
 }
 public String toString() {
  return name+" has a "+animal.toString();
 }
}


the interface IAnimal.java

package annotationAutowire;

public interface IAnimal {
 public void play();
}

the Class Dog.java

package annotationAutowire;

import org.springframework.beans.factory.annotation.Value;
import org.springframework.stereotype.Component;

@Component
public class Dog implements IAnimal {
 @Value("Doug")
 private String name;
 public void play() {
  // TODO Auto-generated method stub
  System.out.println("Playing with "+name);
 }
 public String getName() {
  return name;
 }
 public void setName(String name) {
  this.name = name;
 }
 public String toString() {
  return " Dog with name "+name;
 }
}

the Class Cat.java

package annotationAutowire;

import org.springframework.beans.factory.annotation.Value;
import org.springframework.stereotype.Component;
@Component
public class Cat implements IAnimal {
 
 private String name;
 public void play() {
  // TODO Auto-generated method stub
  System.out.println("Playing with "+name);
 }
 public String getName() {
  return name;
 }
 @Value("jejebel")
 public void setName(String name) {
  this.name = name;
 }
 public String toString() {
  return " Cat with name "+name;
 }
}


The annotation used are

@Component - use for declaring the instance of the class as bean, equivalent to bean tag in .xml file
@Autowired - declares that the element is autowired, equivalent to "autowire" attribute in xml file. The autowiring rules are unchanged. It could be placed at the declaration in the class as well as at the setter method.
@Qualifier - this annotation is used to tell that which component would qualify for autowiring, It can be related to autowire-candidate attribute in .xml file. it's safe to provide one to help in avoiding later conflicts.
@Value - this annotation is used to pass the value as String, it is the equivalent of property and p namespace equivalent in .xml file and can be placed at declaration as well as at setter method.

the config.xml

<?xml version="1.0" encoding="UTF-8"?>
<beans xmlns="http://www.springframework.org/schema/beans"
 xmlns:p="http://www.springframework.org/schema/p" xmlns:xsi="http://www.w3.org/2001/XMLSchema-instance"
 xmlns:context="http://www.springframework.org/schema/context"
 xsi:schemaLocation="http://www.springframework.org/schema/beans
         http://www.springframework.org/schema/beans/spring-beans-3.0.xsd
         http://www.springframework.org/schema/context         
         http://www.springframework.org/schema/context/spring-context-3.0.xsd">


<context:component-scan base-package="annotationAutowire"></context:component-scan>
</beans>


the context:component-scan is used for autodiscovering it will discover all the component (through @Component annotation) in the explicitly directed base-package annotationAutowire and while creating bean through those component it will do the job of autowiring with the help of @Autowired and @Qualifier annotations
Hence like earlier examples we didn't need to define bean and pass the values through property and p namespace. This all was taken care by annotations.
Element : component-scan
Scans the classpath for annotated components that will be auto- registered as Spring beans. By default, the Spring-provided @Component, @Repository, @Service, and @Controller stereotypes will be detected. Note: This tag implies the effects of the 'annotation-config' tag, activating @Required, @Autowired, @PostConstruct, @PreDestroy, @Resource, @PersistenceContext and @PersistenceUnit annotations in the component classes, which is usually desired for autodetected components (without external configuration). Turn off the 'annotation-config' attribute to deactivate this default behavior, for example in order to use custom BeanPostProcessor definitions for handling those annotations. Note: You may use placeholders in package paths, but only resolved against system properties (analogous to resource paths). A component scan results in new bean definition being registered; Spring's PropertyPlaceholderConfigurer will apply to those bean definitions just like to regular bean definitions, but it won't apply to the component scan settings themselves.
Content Model : (include-filter*, exclude-filter*)

the test Class PersonTest.java

package pkg;

import annotationAutowire.Person;
import org.junit.Test;
import org.springframework.context.ApplicationContext;
import org.springframework.context.support.ClassPathXmlApplicationContext;

public class PersonTest {
 @Test
 public void vehicleTest(){
  ApplicationContext context = new ClassPathXmlApplicationContext("config.xml");
  Person person = (Person) context.getBean("person");
  System.out.println(person);
 }
}

The Structure finally is


junit test result without doubt should be "Rahul has a  Dog with name Doug". because the qualifier is set to "dog".......and it can be changed to "cat" to get the autowiring of animal with cat component/bean.

Hope it helps.
 

Thursday, March 15, 2012

Spring Autowiring types with examples

 [ All the examples in this post are basically an extension from the previous post of Spring Basic ]

Autowiring is a feature in Spring through which we can pass the reference of any dependent bean automatically.......This is a step where we are telling the Spring framework to take care of the dependencies.
In that case when Application Context is created the Spring Framework will search for the beans on which it is dependent on according to set guidelines and if and when it finds the bean it will inject that automatically hence we no further need to take care of passing the reference.
Controls whether bean properties are "autowired". This is an automagical process in which bean references don't need to be coded explicitly in the XML bean definition file, but rather the Spring container works out dependencies. There are 4 modes: 1. "no" The traditional Spring default. No automagical wiring. Bean references must be defined in the XML file via the element (or "ref" attribute). We recommend this in most cases as it makes documentation more explicit. Note that this default mode also allows for annotation- driven autowiring, if activated. "no" refers to externally driven autowiring only, not affecting any autowiring demands that the bean class itself expresses. 2. "byName" Autowiring by property name. If a bean of class Cat exposes a "dog" property, Spring will try to set this to the value of the bean "dog" in the current container. If there is no matching bean by name, nothing special happens. 3. "byType" Autowiring if there is exactly one bean of the property type in the container. If there is more than one, a fatal error is raised, and you cannot use byType autowiring for that bean. If there is none, nothing special happens. 4. "constructor" Analogous to "byType" for constructor arguments. If there is not exactly one bean of the constructor argument type in the bean factory, a fatal error is raised. Note that explicit dependencies, i.e. "property" and "constructor-arg" elements, always override autowiring. Note: This attribute will not be inherited by child bean definitions. Hence, it needs to be specified per concrete bean definition

What did I mean by "set guidelines"?? for Spring Framework to find the correct bean we must set some rules.............well nothing speaks better than example....Hence going with our previous example

Our config.xml file will be

<beans xmlns:context="http://www.springframework.org/schema/context" xmlns:p="http://www.springframework.org/schema/p" xmlns:xsi="http://www.w3.org/2001/XMLSchema-instance" xmlns="http://www.springframework.org/schema/beans" xsi:schemalocation="http://www.springframework.org/schema/beans
         http://www.springframework.org/schema/beans/spring-beans-3.0.xsd
         http://www.springframework.org/schema/context         
         http://www.springframework.org/schema/context/spring-context-3.0.xsd">


<bean class="pkg.Person" id="person" p:name="Rahul" autowire="byType">   
</bean>
<bean class="pkg.Dog" id="Dog" p:name="Doug" autowire-candidate="false"></bean>
<bean class="pkg.Cat" id="Cat" p:name="Jejebel"> 
 </bean></beans>
Note that the autowiring is "byType" , it simply means in the Person Class the type of "animal" is IAnimal......Hence the Spring framework in the Application Context will search for all beans with type IAnimal and will inject(connect) it to the animal and hence it's autowired. We don't need to explicitly pass the reference of any bean for animal property as in Spring Basic Example.

Now the question arises what if it finds more than one bean which have type IAnimal as in our case "Dog" and "Cat" both are of type IAnimal.........It certainly would throw an error due to indecision for which bean to use something like - "org.springframework.beans.factory.UnsatisfiedDependencyException: Error creating bean with name 'person' defined in class path resource [config.xml]: Unsatisfied dependency expressed through bean property 'animal': : No unique bean of type [pkg.IAnimal] is defined: expected single matching bean but found 2: [Dog, Cat]; nested exception is org.springframework.beans.factory.NoSuchBeanDefinitionException: No unique bean of type [pkg.IAnimal] is defined: expected single matching bean but found 2: [Dog, Cat]".

If we would have used byName this problem won't have been there since two beans can't have same name(id) more on it later.........but we are not using that.
the solution is using an autowire-candidate property on beans as the bean "Dog" have autowire-candidate as false which simply means that this bean is not available for autowiring that simply means that only bean "Cat" is available for autowiring.
Indicates whether or not this bean should be considered when looking for matching candidates to satisfy another bean's autowiring requirements. Note that this does not affect explicit references by name, which will get resolved even if the specified bean is not marked as an autowire candidate.

Now when we run our test class it will give an output "Rahul has a  Cat with name Jejebel" 

It could be tedious to provide the kind of autowire for many beans specially when you are following a definite norm.......like you want all the beans to be autowired with "byName". Spring has provided the facility, all you need to do is in the configuration xml file set the default autowire as "byName". point to keep in mind that it will only work for one configuration file (you can have multiple) and not for the full application context. So you can organize all your same type autowired bean in one configuration file and set the default for that very xml file

test will again give you the same result .

But what If you need to have a default-autowire as "byType" in your configuration file but there are a few exceptions which needs to be autowired as "byName". Well in that case you can override the default autowiring just by specifically declaring it for the respective bean as "byName".

<beans xmlns:context="http://www.springframework.org/schema/context" xmlns:p="http://www.springframework.org/schema/p" xmlns:xsi="http://www.w3.org/2001/XMLSchema-instance" xmlns="http://www.springframework.org/schema/beans" xsi:schemalocation="http://www.springframework.org/schema/beans
         http://www.springframework.org/schema/beans/spring-beans-3.0.xsd
         http://www.springframework.org/schema/context         
         http://www.springframework.org/schema/context/spring-context-3.0.xsd"
          default-autowire="byType">
   
<bean class="pkg.Person" id="person" p:name="Rahul">  
</bean>
<bean class="pkg.Dog" id="Dog" p:name="Doug" autowire-candidate="false"></bean>
<bean class="pkg.Cat" id="Cat" p:name="Jejebel">
</bean></beans>

Not just that you still can use the (older style) property with ref attribute for passing the dependency even if you are using an autowire tag on it. Hence its flexible.

Let's talk about the kind of autowiring

What we saw in the earlier example was "byType". have a look at the whole bunch :-

 > no - no autowiring should be done on the particular bean and the dependency
must be passed explicitly through "ref" attribute.

 > byNameAttempts to match all properties of the autowired bean with beans
that have the same name (or ID) as the properties. Properties for which there’s
no matching bean will remain unwired.

 > byTypeAttempts to match all properties of the autowired bean with beans
whose types are assignable to the properties. Properties for which there’s no
matching bean will remain unwired.

 > constructorTries to match up a constructor of the autowired bean with
beans whose types are assignable to the constructor arguments.

 > autodetectAttempts to apply constructor autowiring first. If that fails,
byType will be tried.


We have already seen the example of autowire as "byType"

now let's see an example with autowire equal to "byName"

<beans xmlns:context="http://www.springframework.org/schema/context" xmlns:p="http://www.springframework.org/schema/p" xmlns:xsi="http://www.w3.org/2001/XMLSchema-instance" xmlns="http://www.springframework.org/schema/beans" xsi:schemalocation="http://www.springframework.org/schema/beans
         http://www.springframework.org/schema/beans/spring-beans-3.0.xsd
         http://www.springframework.org/schema/context         
         http://www.springframework.org/schema/context/spring-context-3.0.xsd">


<bean class="pkg.Person" id="person" p:name="Rahul" autowire="byName">  
</bean>
<bean class="pkg.Dog" id="animal" p:name="Doug"></bean>
<bean class="pkg.Cat" id="Cat" p:name="Jejebel">
</bean></beans>

run the test again and it will output "Rahul has a  Dog with name Doug".

Thing to notice is that the name of bean "Dog" has been changed to "animal" on purpose, this way the the IAnimal type "animal" variable of class Person is mapped with the bean named "animal" and hence the dependency is autowired by Spring Framework according to the name.

Hence when the application context is created the framework search for the bean named "animal" and inject it into the bean "person" since the autowiring is "byName"

Now let's see the autowiring by constructor......to display this I would need to alter the class as I need to add a constructor to the Person class

the Person Class

public class Person {
 private String name;
 private IAnimal animal;
 
 public Person(IAnimal animal) {
  this.animal = animal;
 }
 public void setName(String name) {
  this.name = name;
 }
 public String getName() {
  return name;
 }
 public IAnimal getAnimal() {
  return animal;
 }
 public String toString() {
  // TODO Auto-generated method stub
  return name+" has a "+animal.toString();
 }

changes are that there are no setter for IAnimal type animal.......instead it is set with the constructor.....in the constructor the reference is passed as an argument.

config.xml

<beans xmlns:context="http://www.springframework.org/schema/context" xmlns:p="http://www.springframework.org/schema/p" xmlns:xsi="http://www.w3.org/2001/XMLSchema-instance" xmlns="http://www.springframework.org/schema/beans" xsi:schemalocation="http://www.springframework.org/schema/beans
         http://www.springframework.org/schema/beans/spring-beans-3.0.xsd
         http://www.springframework.org/schema/context         
         http://www.springframework.org/schema/context/spring-context-3.0.xsd">


<bean class="pkg.Person" id="person" p:name="Rahul" autowire="constructor">  
</bean>
<bean class="pkg.Dog" id="Dog" p:name="Doug" autowire-candidate="false"></bean>

<bean class="pkg.Cat" id="Cat" p:name="Jejebel">
</bean></beans>

Run the test and it will print "Rahul has a  Cat with name Jejebel".

Hence it is clear that when autowire is constructor.......Spring framework will search for the constructor with argument type as IAnimal and then will search for the bean type "IAnimal" and then passes that bean to set animal.

autowire-candidate="false" is used for the same reason as for it was used in autowire byType.

I am not providing any example of autowire as "autodetect" since this is nothing but a combination of autowire by constructor and byType respectively i.e. it looks for constructor with argument type and if there is none it looks for the type and searches the bean accordingly.


Well this is not all.....we still have "autowire with annotation" and autodiscover features....................but that in other post......

Saturday, March 3, 2012

Spring p:namespace example

Continuing with what we learnt in the Spring Basic we will move on to other functionality

for now our example would be same as the basic example i.e.

Person.java
IAnimal.java
Dog.java
Cat.java

Now we will see the p:namespace option in the Spring config file config.xml

<?xml version="1.0" encoding="UTF-8"?>
<beans xmlns="http://www.springframework.org/schema/beans"
    xmlns:p="http://www.springframework.org/schema/p"     <!-- This line is required for p:namespace to work -->
    xmlns:xsi="http://www.w3.org/2001/XMLSchema-instance"  
    xmlns:context="http://www.springframework.org/schema/context"
    xsi:schemaLocation="http://www.springframework.org/schema/beans
         http://www.springframework.org/schema/beans/spring-beans-3.0.xsd
         http://www.springframework.org/schema/context         
         http://www.springframework.org/schema/context/spring-context-3.0.xsd">

<bean id="person" class="pkg.Person" p:name="Rahul"> 
    <property name="animal" ref="Dog"/>    
</bean>

<bean id="Dog" class="pkg.Dog" p:name="Doug"/>
<bean id="Cat" class="pkg.Cat" p:name="Jejebel"/>

</beans>

If we run the test now it will print the same "Rahul has a Dog with name Doug"....So as you can see the third line initializes the p namespace function through which we get rid of extra property tag in .xml which made the file heavy.
as for p namespace does the same thing which property tag does, it passes the value to the setter method and it's more readable.

To make it more clear if the Person class has an integer age property, then we can pass avalue through p namespace as p:age="32"

But unfortunately we can't pass reference through p namespace. Hence still where we need to pass the reference we are passing other bean we still have to go with property tag.

Do we have anything where we can pass the reference to other bean without property tag?
The answer fortunately is "Yes" however that's a totally unique functionality and hence much more important than p namespace, It's called "Autowiring"

Tuesday, February 28, 2012

Spring Basic Example

I am providing a very basic example of Spring :-

Firstly I created a "Maven project"

Inside there is a person class person.java

package pkg;

public class Person {
    
    private String name;
    private IAnimal animal;
    
    public void setName(String name) {
        this.name = name;
    }
    public String getName() {
        return name;
    }
    public IAnimal getAnimal() {
        return animal;
    }
    public void setAnimal(IAnimal animal) {
        this.animal = animal;
    }
    public String toString() {
        return name+" has a "+animal.toString();
    }
}

the Interface IAnimal.java

package pkg;

public interface IAnimal {
    public void play();
}

the animal Dog.java

package pkg;

public class Dog implements IAnimal {
    private String name;
    public void play() {
        System.out.println("Playing with "+name);
    }
    public String getName() {
        return name;
    }
    public void setName(String name) {
        this.name = name;
    }
    public String toString() {
        return " Dog with name "+name;
    }

}

the animal Cat.java

Friday, February 17, 2012

Spring Security custom login page infinite redirect problem [Solved]

In Spring security we have an option so that we can define our own custom login page instead of one provided by Spring application context framework, this login page is used for determining the ROLE and authentication of certain user using the web application.

However I got into a problem using that when I tried the below security XML configuration :-


    <http>
            <intercept-url pattern="/**" access="ROLE_USER"/>
            <form-login login-page="/login"
            login-processing-url="/static/j_spring_security_check"
            authentication-failure-url="/login?error=t"/>
        </http>
       
        <authentication-manager>
         <authentication-provider>
          <user-service>
           <user name="rahul" password="rahul123" authorities="ROLE_ADMIN,ROLE_USER"/>
          </user-service>
         </authentication-provider>
        </authentication-manager>
       
when I hit the URL it was getting into an infinite redirect request for the login page, Firefox gave an error message like "Firefox has detected that the server is redirecting the request for this address in a way that will never complete".

When I looked into it I could get the real reason of the problem. Actually since the pattern for intercept-url security tag was "/**". It simply meant that any request which start with "/" should be intercepted and authenticated for ROLE_USER. For this authentication purpose Application Context searches for "/login" page but "/login" also start with "/" and hence it is again intercepted and should be authenticated for ROLE_USER for which it would again go for "/login". So it actually is a perfect example of Catch-22 situation. the request was kept redirecting to itself.

Now since we have understood the problem the solution should not be difficult. personally I think giving a pattern as "/**" has dangerous conundrum so instead one should use something like "/home/**" (or any other pattern which should not cover "/login")  for intercept-url so that "/login" should not be authenticated. doing this solved my problem.
     

        <intercept-url pattern="/home/**" access="ROLE_USER"/>